使用Stable Diffusion WebUI生成高清图片
本文将指导读者完成安装Stable Diffusion WebUI的过程,并教你如何生成高质量图像。
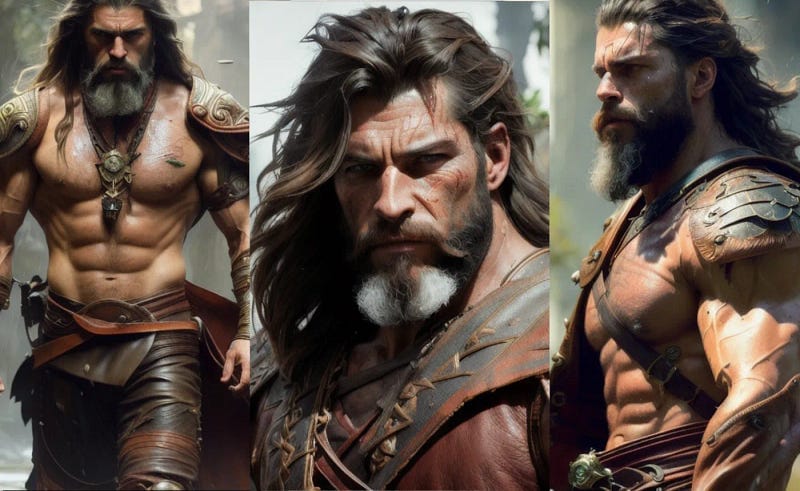
本文将指导读者完成安装Stable Diffusion WebUI的过程,并教你如何生成高质量图像。
简介
在这篇博文中,我将指导你完成安装Stable Diffusion WebUI的过程,并教你生成高质量图像的基本技能。我希望这篇文章能够帮助你开始使用这些强大的AI工具。
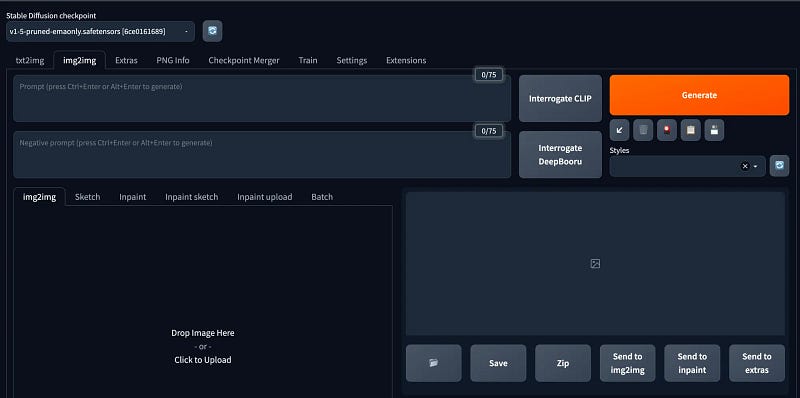
Stable Diffusion WebUI (链接) 是一个基于Gradio稳定扩散库的浏览器界面,它为你提供了一个用户友好的图形界面,用于与稳定扩散进行互动。
它看上去如下:
免责声明:本博客仅反映我的个人观点。
前提条件
在我们开始之前,请确保我们已经具备了以下条件:
- 一个运行Linux操作系统的主机 (本文将使用Ubuntu 22.04 LTS, 但是其他发行版应该也没问题)
- 具备root或者sudo权限
- 稳定的Internet连接
你可以使用自己的带GPU的电脑, 不过我更熟悉EC2, 所以我将使用AWS EC2的实例:
- AWS EC2 Ubuntu 22.04 amd64 server in Tokyo
- g5.2xlarge
- 300GB gp3
第一步: 在EC2上安装WebUI
更新安全组

记得更新你的EC2安全组,并允许你的IP进入EC2的SSH端口和 WebUI端口。
为了安全起见,最好只允许你自己的IP。
连接到你的实例
你可以使用SSH隧道,这样你就可以访问你的本地IP来访问WebUI。
安装GPU驱动
使用这些命令准备好环境。
sudo apt-get update -y
sudo apt-get upgrade -y linux-aws
sudo reboot
sudo apt-get install -y gcc make linux-headers-$(uname -r)
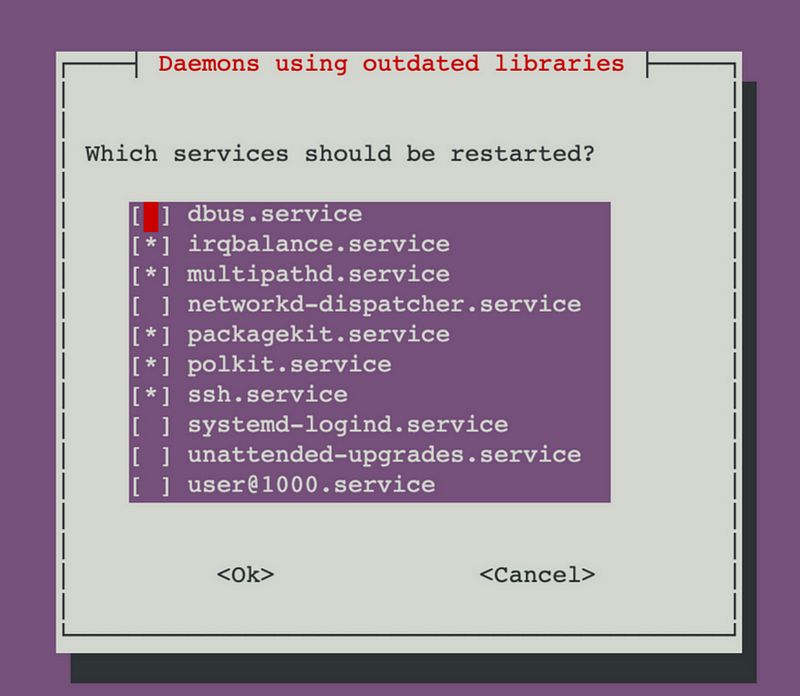
如果你看到这样的画面, 直接选择OK
按照这个说明来安装正确的GPU驱动, 下面的命令仅供参考:
sudo apt-get install linux-headers-$(uname -r)
distribution=$(. /etc/os-release;echo $ID$VERSION_ID | sed -e 's/\.//g')
wget https://developer.download.nvidia.com/compute/cuda/repos/$distribution/x86_64/cuda-keyring_1.0-1_all.deb
sudo dpkg -i cuda-keyring_1.0-1_all.deb
sudo apt-get update
sudo apt-get -y install cuda-drivers
sudo apt install python3-pip
pip install torch
你可能还需要用这个Python脚本来测试Cuda是否以正确安装
import torch

print(torch.cuda.is_available())
print(torch.cuda.current_device())
如果Cuda安装正确, 你将看到这个结果:
ubuntu@ip-172-31-13-187:~$ python3 cudatest.py
True
0
安装WebUI
启动EC2后,你可以使用SSH连接到你的EC2,然后我们就可以开始安装Stable Diffusion和WebUI。下面是一个参考指南。
首先,更新你的系统,以确保所有的软件包都是最新的,然后安装依赖项:
# Debian-based:
sudo apt update
sudo apt upgrade
sudo apt install wget git python3 python3-venv python3-pip- 如果要安装至 $HOME/stable-diffusion-webui/, 运行:
/bin/bash
sudo su - ubuntu
bash <(wget -qO- <https://raw.githubusercontent.com/AUTOMATIC1111/stable-diffusion-webui/master/webui.sh>)
第二步: 启动 Stable Diffusion WebUI
使用如下命令启动WebUI
cd $HOME/stable-diffusion-webui
./webui.sh
在运行./webui.sh时,你可以增加一些额外的参数
./webui.sh [--listen] [--xformers] [--share]— listen, 是指暴露一个端口,如果你需要一个负载均衡器(Load balancer)来转发流量到EC2实例,请添加这些选项— share, 它将创建一个DNS网址来访问你的实例— xformers, 如果你想为Stable Diffusion添加xformers的支持, 选择此项
这将在默认端口(7860)上启动一个Web服务器。如果你使用的是 —listen,那么你可以通过打开浏览器并导航到http://YOUR_EC2_IP_ADDRESS:7860,来访问 WebUI。
你可以跳过 “Access the WebUI without listen and share options”,并开始。
Access the WebUI without listen and share options
我个人更喜欢使用SSH隧道来访问EC2实例,- listen和- share与扩展安装有一些冲突。
所以这里是ssh隧道命令。
ssh -L 127.0.0.1:7860:127.0.0.1:7860 -i "stable-diffusion.pem" [email protected]你可以通过打开浏览器并访问http://localhost:7860,来访问 WebUI。
第三步: 安装Checkpoints
了解预训练模型
在图像生成的核心,我们发现预训练的模型,通常被称为Checkpoint文件。这些模型由预先训练的稳定扩散权重组成,旨在生成一般的视觉效果或特定类型的图像。
一个模型所能产生的图像类型是由其训练过程中使用的数据决定的。例如,如果一个模型在训练过程中从未遇到过猫,那么它就不能生成猫的图像。同样,如果训练数据只包括猫的图像,该模型将只能生成猫的图像。
主流的模型
有几个大家熟知的预训练模型可用于图像生成,包括:
- SD v1.5
- Deliberate
- Anything V4
- Anything V5
- Open Journey v4
每个模型都是为不同的目的和流派量身定做的,所以选择一个符合你具体需求和目标的模型是至关重要的。你也可以在CivitalAI网站上了解不同的模式。
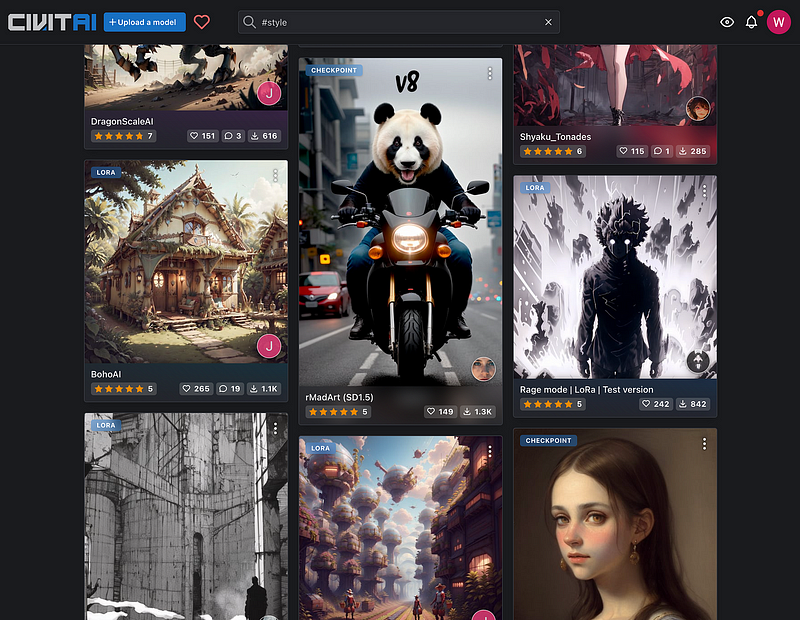
安装 Checkpoints
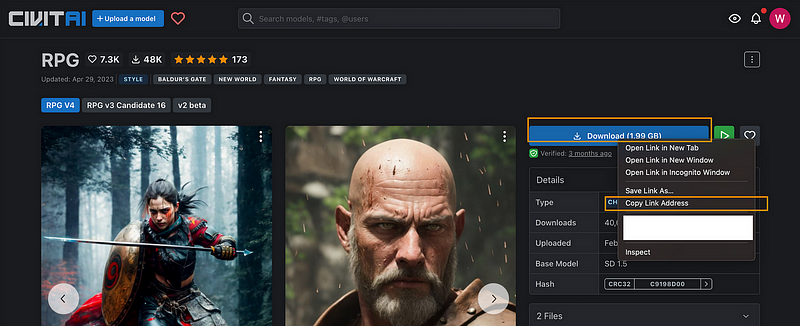
我们将在本教程中使用RPG Checkpoint,访问该模型页面,右击下载按钮,然后点击 “复制链接地址”:
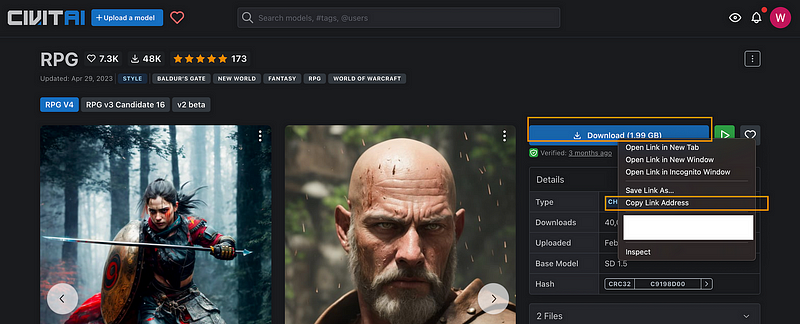
该模型需要放置在models/Stable-diffusion文件夹下,运行以下命令:
cd ~/stable-diffusion-webui/models/Stable-diffusion
wget --content-disposition THE_LINK_YOU_COPIED
或者使用你自己的电脑下载好文件, 然后通过scp上传到EC2
scp ~/Downloads/checkpointfile [email protected]:/tmp
cp /tmp/checkpointfile ~/stable-diffusion-webui/models/Stable-diffusion/
下载完后, 在页面的左上角, 选择重新加载 (Reload)
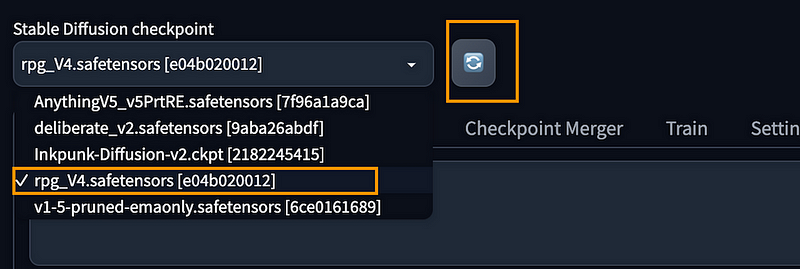
现在我们可以选择RPG Checkpoint了
第四步: 下载VAE文件
在使用Stable Diffusion模型生成图像时,我们经常使用一种叫做变异自动编码器(VAEs)的工具。VAEs可以帮助模型处理噪声,平滑混合,并节省空间和时间等。
让我们把VAE安装到 WebUI 中。通常情况下,在Checkpoint页面会提示可以使用什么样的VAE文件。例如,在RPG Checkpoint中,它建议我们使用vae-ft-mse-840000-ema,所以我们可以访问:https://huggingface.co/stabilityai/sd-vae-ft-mse-original/blob/main/vae-ft-mse-840000-ema-pruned.ckpt
在 “下载 “链接上点击 “复制链接地址”
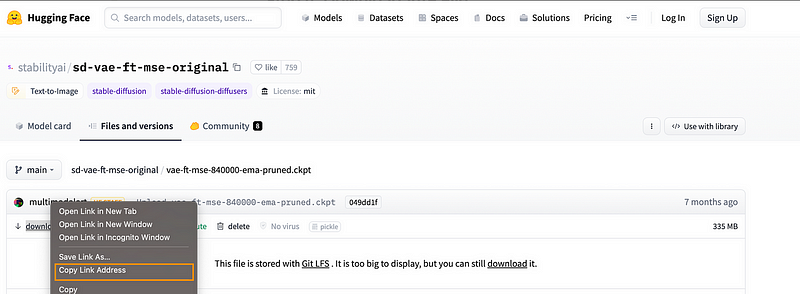
返回Terminal
cd ~/stable-diffusion-webui/models/VAE
wget THE_LINK_YOU_COPIED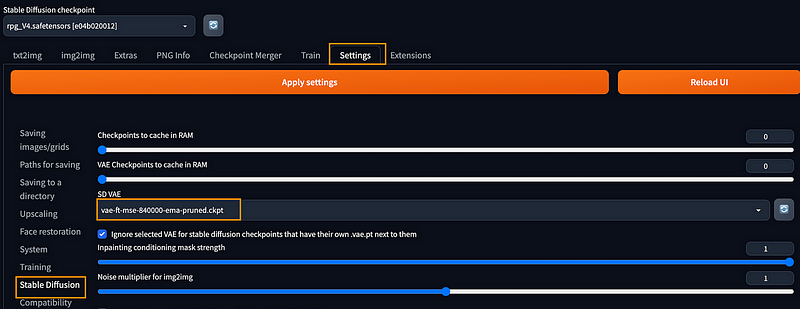
第五步: 开始生成图片!!
Prompt
Stable Diffusion的工作方式是,它从随机噪点开始,在用户以书写提示或文字描述形式的输入引导下,逐渐将其转化为连贯的图像表示。
把这个输入到Prompt
hoto of the most beautiful artwork in the world featuring soft lustrous male hero, ((epic heroic fantasy muscular men rugged wet wounded hero angry looking with long hair and long beard and fierce looking in a dynamic posture dying on the floor, fantastic location, majestic cluttered environment)), full body 8k unity render, action shot, skin pores, very dark lighting, heavy shadows, detailed, detailed face, (vibrant, photo realistic, realistic, dramatic, dark, sharp focus, 8k), (weathered damaged old worn leather outfit:1.4), (intricate:1.4), decadent, (highly detailed:1.4), digital painting, octane render, artstation, concept art, smooth, sharp focus, illustration, art by artgerm, (loish:0.23), wlop ilya kuvshinov, and greg rutkowski and alphonse mucha gracias, (global illumination, studio light, volumetric light), heavy rain, particles floating关于更多的prompt指导, 请参考这个:
- RPG User Guide v4.3 here
否定式Prompt
它指的是指导AI避免在生成的图像中产生某些特征或元素的文本输入。
把这个放在否定式Prompt中:
flower, facial marking, (women:1.2), (female:1.2), blue jeans, 3d, render, doll, plastic, blur, haze, monochrome, b&w, text, (ugly:1.2), unclear eyes, no arms, bad anatomy, cropped, censoring, asymmetric eyes, bad anatomy, bad proportions, cropped, cross-eyed, deformed, extra arms, extra fingers, extra limbs, fused fingers, jpeg artifacts, malformed, mangled hands, misshapen body, missing arms, missing fingers, missing hands, missing legs, poorly drawn, tentacle finger, too many arms, too many fingers, watermark, logo, text, letters, signature, username, words, blurry, cropped, jpeg artifacts, low quality, lowres其他参数
Steps: 20, Sampler: DPM++ 2S a Karras, CFG scale: 7, Seed: 4141022542, Size: 512x728, Model hash: e04b020012, Model: rpg_V4最终呈现
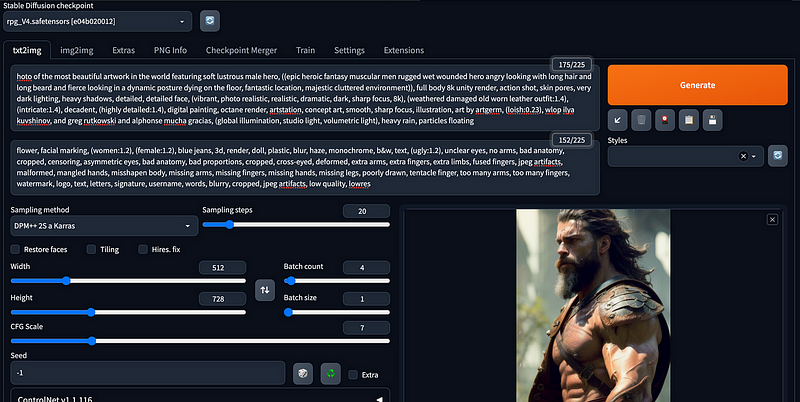
这时, 你就可以点击 “Generate” 按钮了
输出结果
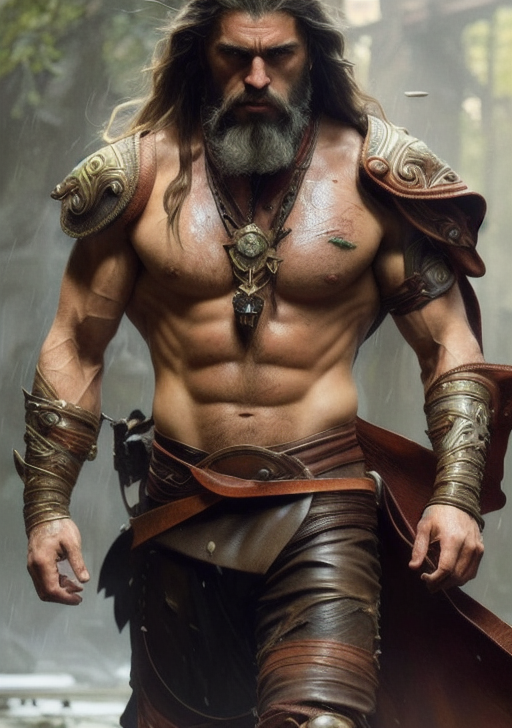
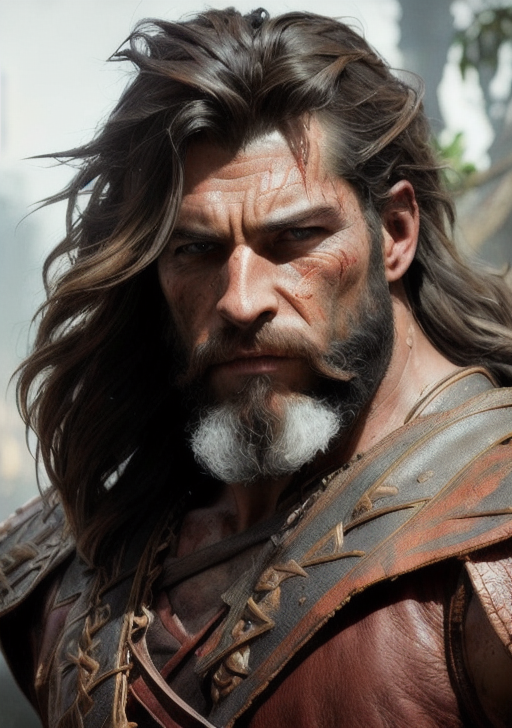
正如你所看到的,图像质量非常高。如果你有兴趣,你可以去CivitalAi下载更多的Checkpoint来试一试!
第六步: 释放EC2资源
- 记住释放EC2的资源, 终止EC2实例, 除非你需要一直访问它, 否则它将产生不菲的成本。
进一步阅读
以下是一些更多的资源供参考:
模型和Checkpoints
- 关于模型的更多解释
- Not Safe For Work (NSFW) — 它包括很多由社区培训的模特。要小心,因为它包括相当多的色情图片。
- 托管的大量开源模型。
Prompts
- 更多具有不同效果的动漫 — https://docs.qq.com/doc/DWHl3am5Zb05QbGVs
- Prompts和图像库 — https://lexica.art/
- 另一个Prompts和图像库 — https://www.krea.ai
- Prompt生成器 — https://promptomania.com
总结
在这篇博文中,我们介绍了Stable Diffusion WebUI、prompt和negative prompt的安装过程和基本用法。这些强大的工具可以让你轻松地使用不同的模型生成高清图像,以达到不同的目的。
你也许会对下列文章感兴趣:
